Chat Application Using Spring
System Requirements:-
- Eclipse Editor or any other.
- JDK 1.5 or higher(I am using jdk 1.7.0_03)
- Spring jars version 2.5.5.
- Other related jars.
Note: - Apache
Active MQ Setup is required for the execution of this example. For doing the
Active MQ Setup please follow the below link:-
Required Jars:-
- activemq-all-5.4.3.jar
- xbean-spring-3.7.jar
- activemq-pool-5.4.3.jar
- commons-pool-1.5.4.jar
- spring-tx.jar
- spring-beans.jar
- spring-context.jar
- spring-context-support.jar
- spring-core.jar
- spring-jms.jar
Note: - I am referring spring framework 2.5.5/dist/modules
directory jars.
Steps for creating Eclipse java
project for implementing spring JMS:-
- Create a java project named ChatApplicationUsingSpring.
- Create a package names com.gauarv.springjms.chatapplicationin the src directory.
- Create a JMSChatUsingSpring class inside the package named com.gauarv.springjms.chatapplication.
- Place the below available code in the JMSChatUsingSpring java file.
JMSChatUsingSpring.java
package
com.gauarv.springjms.chatapplication;
import
java.io.BufferedReader;
import java.io.IOException;
import
java.io.InputStreamReader;
import
javax.jms.JMSException;
import
javax.jms.Message;
import
javax.jms.MessageListener;
import
javax.jms.Session;
import
javax.jms.TextMessage;
import
javax.jms.Topic;
import
javax.jms.TopicConnection;
import
javax.jms.TopicConnectionFactory;
import
javax.jms.TopicPublisher;
import
javax.jms.TopicSession;
import
javax.jms.TopicSubscriber;
import
org.springframework.context.ApplicationContext;
import
org.springframework.context.support.ClassPathXmlApplicationContext;
import
org.springframework.jms.core.JmsTemplate;
public class
JMSChatUsingSpring implements
MessageListener {
private JmsTemplate
messengerJMSTemplate;
private Topic messengerTopic;
private static String userName;
/**
* @return the messengerJMSTemplate
*/
public JmsTemplate
getMessengerJMSTemplate() {
return messengerJMSTemplate;
}
/**
* @param messengerJMSTemplate
*
the messengerJMSTemplate to set
*/
public void
setMessengerJMSTemplate(JmsTemplate messengerJMSTemplate) {
this.messengerJMSTemplate =
messengerJMSTemplate;
}
/**
* @param messengerTopic
*
the messengerTopic to set
*/
public void setMessengerTopic(Topic
messengerTopic) {
this.messengerTopic = messengerTopic;
}
@Override
public void onMessage(Message message)
{
/*
checking the message of TextMessage type */
if (message instanceof TextMessage) {
try {
String
strMessage = ((TextMessage) message).getText();
if (!strMessage.startsWith("["
+ userName))
System.out.println(strMessage);
}
catch (JMSException jmsException) {
String
errMsg = "An Error occurred while extracting message from the
destination";
jmsException.printStackTrace();
}
}
else {
String
errMsg = "Message is not of expected type, as the expected is the
TextMessage";
System.err.println(errMsg);
throw new RuntimeException(errMsg);
}
}
public void subscribe(TopicConnection topicConnection, Topic chatTopic,
JMSChatUsingSpring
springJMSChat) throws JMSException {
TopicSession
topicSession = topicConnection.createTopicSession(false,
Session.AUTO_ACKNOWLEDGE);
TopicSubscriber
ts = topicSession.createSubscriber(chatTopic);
ts.setMessageListener(springJMSChat);
}
public static void main(String
arguments[]) throws JMSException,
IOException {
if (arguments.length != 1) {
System.out.println("User
name is required to join the chat application");
}
else {
//If
user will enter anything then that will be presumed as his name.
userName
= arguments[0];
ApplicationContext
applicationContext = new ClassPathXmlApplicationContext(
"spring-chatapplication.xml");
JMSChatUsingSpring
springJMSChatApplication = (JMSChatUsingSpring) applicationContext
.getBean("jmsMessenger");
TopicConnectionFactory
topicConnectionFactory = (TopicConnectionFactory)
springJMSChatApplication.messengerJMSTemplate
.getConnectionFactory();
TopicConnection
topicConnection = topicConnectionFactory.createTopicConnection();
springJMSChatApplication.publish(topicConnection,
springJMSChatApplication.messengerTopic, userName);
springJMSChatApplication.subscribe(topicConnection,
springJMSChatApplication.messengerTopic,
springJMSChatApplication);
}
}
public void publish(TopicConnection topicConnection, Topic chatTopic,
String userId)
throws JMSException, IOException {
TopicSession
topicSession = topicConnection.createTopicSession(false,
Session.AUTO_ACKNOWLEDGE);
TopicPublisher
topicPublisher = topicSession.createPublisher(chatTopic);
topicConnection.start();
BufferedReader
brReader = new BufferedReader(new InputStreamReader(
System.in));
while (true) {
String
strMessageToSend = brReader.readLine();
if (strMessageToSend.equalsIgnoreCase("exit"))
{
topicConnection.close();
System.exit(0);
}
else {
TextMessage
txtMessage = topicSession.createTextMessage();
txtMessage.setText("\n
[" + userId + " : " + strMessageToSend + "]");
topicPublisher.publish(txtMessage);
}
}
}
}
- Create an XML file and named it as spring-chatapplication.xml in the classpath.
- Place the below code in this file
spring-chatapplication.xml
<?xml version="1.0"
encoding="UTF-8"?>
<beans xmlns="http://www.springframework.org/schema/beans"
xmlns:xsi="http://www.w3.org/2001/XMLSchema-instance"
xmlns:p="http://www.springframework.org/schema/p"
xmlns:context="http://www.springframework.org/schema/context"
xmlns:jms="http://www.springframework.org/schema/jms"
xmlns:amq="http://activemq.apache.org/schema/core"
xsi:schemaLocation="http://www.springframework.org/schema/beans
http://www.springframework.org/schema/beans/spring-beans.xsd
http://www.springframework.org/schema/context
http://www.springframework.org/schema/context/spring-context.xsd
http://www.springframework.org/schema/jms
http://www.springframework.org/schema/jms/spring-jms.xsd
http://activemq.apache.org/schema/core
http://activemq.apache.org/schema/core/activemq-core.xsd">
<amq:connectionFactory id="mqConnectionFactory"
brokerURL="tcp://localhost:61616"
/>
<amq:topic id="msgtopic"
physicalName="messengertopic" />
<!-- JMSTemplate is a Spring template
following the template design pattern
which allows us to communicate with
a message broker via JMS. JMSTemplate
takes care of boiler plate code such
as exception handling and resource management
even take care of connection
pooling. This allows us to concentrate on solving
the 'business' problems, Here, we
are suppling the JMS template with the
connection factory(brokerURL)
mentioned above -->
<bean id="jmsTemplate"
class="org.springframework.jms.core.JmsTemplate">
<property name="connectionFactory"
ref="mqConnectionFactory" />
</bean>
<bean id="jmsMessenger"
class="com.gauarv.springjms.chatapplication.JMSChatUsingSpring">
<property name="messengerJMSTemplate"
ref="jmsTemplate" />
<property name="messengerTopic"
ref="msgtopic" />
</bean>
<!-- DefaultMessageListenerContainer is
the Spring component equivalent
to the EJB MDB(Message Driven
beans). It pools and consumes messages from a JMS
queue. The configuration below is as
follows
1. connectionFactory - this is used
to connect to the Message Broker which
is Apache Active MQ as per
this example.
2. destination - this is the queue
which the MessageListener
container is listening on while
incoming messages.
3. messageListener - this is the
implementation class which will
actually handle the incoming messages. DefaultMessageListener
takes messages from the queue and
passes them to the message listener for
processing.
4. concurrentConsumers - this is the
number of threads that the DefaultMessageListenerContainer
will handle incoming messages. The
default is 1 but in our application
we will have 2 separate threads procsessing
incoming messages. Here DefaultMessageListenerContainer
is the example of MDP(Message Driven
Pojo). -->
<bean id="poiMessageListenerContainer"
class="org.springframework.jms.listener.DefaultMessageListenerContainer">
<property name="connectionFactory"
ref="mqConnectionFactory" />
<property name="destination"
ref="msgtopic" />
<property name="messageListener"
ref="jmsMessenger" />
<property name="concurrentConsumers"
value="1" />
</bean>
</beans>
- Export the project by selecting and right clicking on the project and then select the option as Export.
- In the above window, enlarge the java hierarchy and then select the Runnable JAR file option and then click on Next.
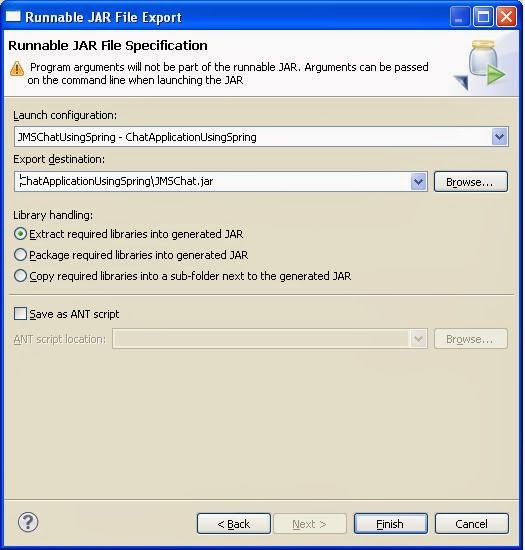
- Follow the same steps as the above window, In the Launch configuration we have to pass the main class which will get executed. Then in the Export destination we need to pass the name of the jar and the location, here I am passing the location as the project context and name of the jar as JMSChat.jar. Then in the library handling, select the checkbox as Extract required libraries into the generated JAR.
- Open the command prompt by typing “cmd” in the Run.
- Start the Apache ActiveMQ server.
- Set the java classpath in the system or user variables and then type the command “java -jar JMSChat.jar gaurav” in order to execute the jar. Here this jar is expecting a parameter as name so I am passing gaurav as that parameter.
- Again open another cmd and type the same command to execute that jar but pass the different name. Whatever we will type in the another window will reflect into the first window and similarly we can execute this jar in many windows and find that it is working as a chat application.
Results:-


No comments:
Post a Comment